Introduction
Sogenactif is a secure multi-channel e-commerce payment solution that complies with the PCI DSS standard. It allows you to accept and manage payment transactions by taking into account business rules related to your activity (payment upon shipping, deferred payment, recurring payment, payment in instalments, etc.).
The purpose of this document is to explain the implementation steps of the Sogenactif Hosted Fields solution up to live operations.
Who does this document target?
This document is intended for merchants wishing to subscribe to the Sogenactif offer and to include a payment page integrated to their website without being subject to the most complete PCI-DSS questionnaire because sensitive data transits through their server. The Sogenactif Hosted Fields connector is based on JSON exchanges using the REST protocol, in machine-to-machine mode.
It is an implementation guide for your technical team.
To get an overview of the Sogenactif solution, we advise you to consult the following documents:
- Functional presentation
- Functionality set-up
The implementation of Sogenactif Hosted Fields is an additionnal option of Sogenactif Office Serveur mode.
To understand how start with Sogenactif Office Serveur, please refer to the dedicated documentation.
Prerequisites
Knowledge of the standards related to web programming languages used today, such as Java, PHP, or .Net, is necessary to develop a client that can connect to the Sogenactif Hosted Fields gateway.
In addition, it is mandatory to have an in-depth knowledge of HTML, CSS and Javascript to develop the card details entry page.
Secret key management
Upon your subscription, SG provides a secret key on the Portail Sogenactif that will allow you to secure exchanges between your website and the Sogenactif server.
You are responsible for looking after this key and should take all measures to:
- restrict access to the key
- safeguard it by encrypting it
- never copy it onto a non-secure disc or device
- never send it (via e-mail or regular mail) in a non-secure method
A secret key compromised (and used by a malicious third party) might disrupt the regular operation of your shop and might in particular generate unauthorised sales or cash transactions (e.g. refunds).
The very same secret key is used on the various Sogenactif Paypage, Sogenactif Office Serveur, Sogenactif In-App and Sogenactif Walletpage connectors.
keyVersion field with the new
version, otherwise you will get an answer code 34 (suspected
fraud).Contacting the support
For any question or request for technical assistance, you can contact the usual Sogenactif support on 0 825 090 095 (0.15€/min + call charge - rate as of 02/11/2022) from Monday to Friday, from 9am to 7pm, excluding public holidays, or write to supportsogenactif@worldline-solutions.com specifying your VAD or MID contract number for a more efficient handling of your request.
Complying with PCI-DSS
This feature will allow you to reduce PCI constraints and thus be subject only to SAQ A impacts.
https://www.pcisecuritystandards.org/pci_security/completing_self_assessment
Understanding payments with Sogenactif Hosted Fields
Client-side encryption is a JavaScript library integrated into your payment page. This library allows sensitive data to be managed through iFrames managed by Sogenactif before the web form is submitted to your server.
The resultant encrypted data is then used to call the Sogenactif Office Serveur card payment services for processing purposes.
The Sogenactif Hosted Fields feature provides the following benefits:
- You can keep on managing and hosting your payment pages while outsourcing the security requirements.
- Customers are not required to be redirected to a page hosted by Sogenactif (Sogenactif Paypage).
- PCI impacts are reduced because no sensitive data is conveyed in clear on your server.
The general principle of the payment process is as follows:
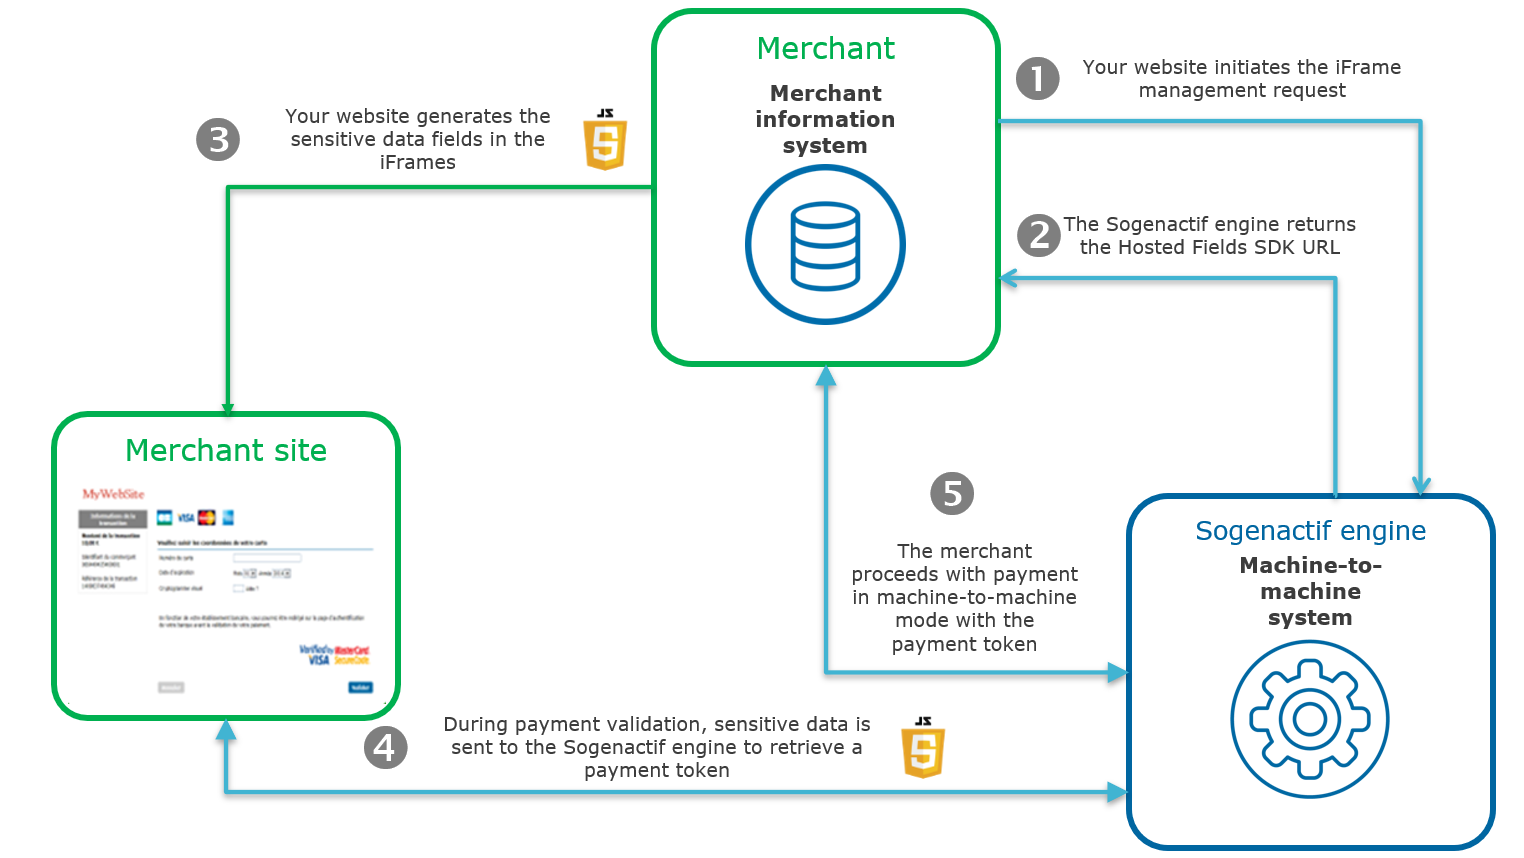
1. Your server contacts the Sogenactif server to initiate the iFrame management request.
2. The Sogenactif server returns the URL of the client Javascript library to be integrated into the sensitive data entry page.
3. Your server generates the sensitive data entry page by generating one iFrame per sensitive data on the entry page. This iFrame uses the URL retrieved in step 2 to set up the sensitive data type (card number, security code, expiry date).
4. During payment validation, sensitive data is sent to the Sogenactif server which returns a payment token.
5. Your server sends the payment token to the Sogenactif server to handle the transaction.
Getting started with Sogenactif Hosted Fields in 6 steps
When the paymentToken field is populated, the
Sogenactif Hosted Fields mode is available with Sogenactif Office Serveur for the following functions:
cardOrderwalletOrdercardCheckEnrollmentwalletCheckEnrollmentcreditHolderaddCard
To understand how to get started with Sogenactif Office Serveur, please refer to the dedicated documentation.
You cannot use Sogenactif Hosted Fields independently, it should always be used with Sogenactif Office Serveur to make payments on your site.Step 1: registering the shop
In order to register your shop as live, you are required to complete the registration form sent by SG and to send the form back to SG.
When filling in the form, you must appoint an administrator contact and a technician contact so that SG can send you the information needed to launch your shop.
SG will then register your shop and e-mail you your merchant ID (merchantId), together with your Portail Sogenactif ID and password.
For Portail Sogenactif connection, the contact given in the Sogenactif contract - "Sogenactif Portal" section will receive an e-mail containing the identifier and a link to generate their own password. For Sogenactif Téléchargement connection, the contact given in the Sogenactif contract - section "Sogenactif Download" will receive their password by e-mail, the identifier will be sent by a separate e-mail to the contact indicated for the MEX.
Step 2: retrieving the Hosted Fields SDPX library URL
Authenticating yourself to retrieve the SDPX library URL from your server
The URL is: https://office-web.sogenactif.com/rs-services/v2/authentication/hostedFieldsInitialize
The value of the interfaceVersion field must be set to AUT_WS_2.57.
Request syntax
The request is structured in accordance with the JSON format:
{“<field name>”: ”<value name>”, “<field name>”: “<value name>”, “field name”: “value Name” etc., “seal”: “seal value” }Sample initialisation request:
{"customerIpAddress": "132.26.54.63","InterfaceVersion version": "AUT_WS_2.57","merchantId": "012345678911111","keyVersion":"1","seal": "112a4b079ece08a0a55511cd5469fc47051d6ddb1404623170ba3873668e5c58" }The syntax used to create a JSON list complies with the standard. Below is a structure summary for the two main list types: simple field lists (e.g. character strings) and object lists.
A very same field can have a list of values:
…,"field name" : ["value1","value2"],…For example, when making payment requests with the paymentMeanBrandList field valued with VISA
and MASTERCARD:
…,"paymentMeanBrandList": ["VISA","MASTERCARD"],…Securing the request
The authentication request includes the settings to retrieve the SDK and is sent by your server. A hacker can theoretically intercept the request and modify its content before the data reaches the payment server.
As a result, it is necessary to strengthen security to ensure the integrity of parameters in the request sent. Sogenactif meets this need by exchanging signatures to check:
- the integrity of the request and response messages (and therefore the absence of changes during the exchange)
- the authentication of the sender and the recipient because they share the same secret key
How to secure the request
The request is secured by calculating the hash value in line with the transaction parameters. Then, the secret key is added to it. All character strings are converted to UTF-8 before being hashed.
The hashing algorithm generates an irreversible result. When such a message is received, the recipient needs to recalculate the hash value and compare it with the one received. Any difference indicates that the data exchanged was falsified, or that the recipient and the issuer do not share the same secret key.
The result must be sent in hexadecimal format in the data element named Seal.
Calculating the Seal data element
HMAC-SHA algorithm
The value of the Seal data element is computed as follows:
- Concatenation of data field values in the alphabetical order of
field names (in accordance with ASCII character codes), without
integrating the keyVersion and sealAlgorithm fields.
Giving the field data, mentioned in the examples below.
- as an example, a field that would be named authorMessageReference must be positioned before another field named authorisationId
- Obtaining the UTF-8 encoding of the data from the previous result
- HMAC with SHA256 encryption of bytes obtained with the secret key
This procedure can be summarised as follows:
HMAC-SHA256( UTF-8(sortedDataValues), UTF-8(secretKey))For the seal to be computed with the SHA-256 algorithm,
the input parameters of the request must include the sealAlgorithm field populated with the
following value: “SHA-256”.
Hmac Sha256 sample code
- Sample Hmac Sha256 encoding in Php 5
<?php

…

// Seal computation thanks to hash sorted data hash with merchant key

$data_to_send= utf8_encode($data)

$seal=hash_hmac('sha256', $data_to_send, $secretKey);

…
…

?>
data_to_send and secretKey must use a UTF-8 character set. Please refer to the utf8_encode function for the conversion of ISO-8859-1 characters in UTF-8.
- Sample Hmac Sha256 encoding in Java
import java.security.InvalidKeyException; import java.security.NoSuchAlgorithmException; import javax.crypto.Mac; import javax.crypto.spec.SecretKeySpec; public class ExampleHMACSHA256 { /** * table to convert a nibble to a hex char. */ static final char[] hexChar = { '0' , '1' , '2' , '3' , '4' , '5' , '6' , '7' , '8' , '9' , 'a' , 'b' , 'c' , 'd' , 'e' , 'f'}; /** * Fast convert a byte array to a hex string * with possible leading zero. * @param b array of bytes to convert to string * @return hex representation, two chars per byte. */ public static String encodeHexString ( byte[] b ) { StringBuffer sb = new StringBuffer( b.length * 2 ); for ( int i=0; i<b.length; i++ ) { // look up high nibble char sb.append( hexChar [( b[i] & 0xf0 ) >>> 4] ); // look up low nibble char sb.append( hexChar [b[i] & 0x0f] ); } return sb.toString(); } /** * Computes the seal * @param Data the parameters to cipher * @param secretKey the secret key to append to the parameters * @return hex representation of the seal, two chars per byte. */ public static String computeSeal(String data, String secretKey) throws Exception { Mac hmacSHA256 = Mac.getInstance("HmacSHA256"); SecretKeySpec keySpec = new SecretKeySpec(secretKey.getBytes(), "HmacSHA256"); hmacSHA256.init(keySpec); return encodeHexString(hmacSHA256.doFinal(data.getBytes())); } /** * @param args */ public static void main(String[] args) { try { System.out.println (computeSeal("parameters", "key")); } catch (Exception e) { e.printStackTrace(); } } } - Sample Hmac Sha256 encoding in .net
(Carried out using a simple form called "Form1" containing two text fields to enter data and txtSecretKey, and another field to display lblHEX).
using System;
using System.Collections.Generic;
using System.ComponentModel;
using System.Data;
using System.Drawing;
using System.Text;
using System.Windows.Forms;
using System.Security.Cryptography;

namespace ExampleDotNET
{
    public partial class Form1 : Form
    {
        public Form1()
        {
            InitializeComponent();
        }

        private void cmdGO_Click(object sender, EventArgs e)
        {
            String sChaine = data.Text;
            UTF8Encoding utf8 = new UTF8Encoding();
            Byte[] encodedBytes = utf8.GetBytes(sChaine);

            byte[] shaResult;

            HMAC hmac = new HMAC.Create("HMACSHA256");
            var key = "YourSecretKey";
            hmac.Key = utf8.GetBytes(key);
            hmac.Initialize();

            shaResult = hmac.ComputeHash(encodedBytes);

            lblHEX.Text = ByteArrayToHEX(shaResult);
        }

        private string ByteArrayToHEX(byte[] ba)
        {
            StringBuilder hex = new StringBuilder(ba.Length * 2);
            foreach (byte b in ba)
                hex.AppendFormat("{0:x2}", b);
            return hex.ToString();
        }

    }
}
Seal calculation validation
Once you have set up your seal calculation, here is a sample request to help you verify that you find the correct seal:
{
  "interfaceVersion" : "AUT_WS_2.34",
  "keyVersion" : "1",
  "merchantId" : "011223344550000",
  "seal" : "e94ea7b4b99f52e28dee23327ef0a76b6fcd4e8f2a99b5deb243a8733d2ae647"
}
For the above request, the concatenated string you must obtain is:
AUT_WS_2.341011223344550000With a HMAC-SHA-256 hash algorithm and the following secret key:
secret123The expected seal is:
e94ea7b4b99f52e28dee23327ef0a76b6fcd4e8f2a99b5deb243a8733d2ae647Populating the hostedFieldsInitialize request fields
The fields are described on this page.
Handling errors when authenticating and retrieving the SDPX library URL
The Sogenactif server checks each received field individually. The following list contains the error codes that can be returned during the verification step, as well as the solutions to be implemented.
| ResponseCode | Description |
|---|---|
| 00 | Normal situation followed by the normal process of calling
the cardOrder
function. |
| 03 | The merchantId or the
acquirer contract is not correct. |
| 12 | The request parameters are incorrect. Check the request
parameters (the error is specified in the errorFieldName field). |
| 30 | The request format is incorrect (the error is specified in
the errorFieldName
field). |
| 34 | Security issue: e.g. the calculated seal is incorrect. |
| 40 | You do not have the right to call this function. |
| 99 | Service temporarily unavailable. |
There are 4 possible cases:
- responseCode = 00
This case must be followed by the call to the Sogenactif Office Serveur function allowing payment.
- responseCode = 03, 12, 30, 34
These error codes indicate that the request has a issue that needs to be fixed. The authentication process should then be interrupted.
- responseCode = 40
This error code indicates that you do not have the right to access this function. You need to get in touch with the technical support to get this right.
- responseCode= 99
Authentication service availability issue. You need to try sending the request again.
Step 3: implementing the sensitive data entry form
Description of the flows
Form flows are done with 3 steps:
- retrieve SDPX library;
- iframe initialisation with create method;
- form validation with tokenize method.

Integrating the Hosted Fields SDPX Javascript library
The first thing to do is to include the call to the SDPX JavaScript
library in the head tag of your payment page. This URL and the name
of the SDPX library were retrieved during the initialize function call
in the sdkUrl field.
<script type="text/javascript" src="<LIBRARY_URL_AND_NAME>" id="sdpx-hostedfields-sdk" integrity="<INTEGRITY>" crossorigin="anonymous"></script>id="sdpx-hostedfields-sdk" parameter is
mandatory and should not be changed. It allows the SDPX library to perform
certain initialisations steps.The library URL and name must therefore be embedded using a variable in the above shown example.
Also, we can change the SDPX Javascript library URL or name (or the contents of the library) at any time, therefore please do not assume that this URL and the name will remain unchanged over time.
SDPX Javascript library is not compatible with Internet Explorer browser. You can use it with browsers like Chrome, Safari, FireFox, Edge or based on Chromium browser.
In order to ensure PCI-DSS v4 compliance of your SDPX library on your payment page, the call to the initialize function also returns a field integrity, which you can fill in your script tag including the library. This field contains a SHA-384 value related to the context of the SPDX library and will be in the form "sha384-<BASE_64_DATA>". You also have to value crossorigin attribute to anonymous.
To be able to receive the integrity field in initialize function response, you need to set the interfaceVersion
to AUT_WS_2.57 or more.
We also suggest you to integrate the keyword nonce in your "inline" JavaScript scripts.
To verify the integrity of a resource (subresource-integrity) served from an origin different than the document in which it is embedded, the browser performs a Cross-Origin Resource Sharing (CORS) verification of the resource. To do this, the crossorigin attribute must be present in the resource tag. Setting this field to anonymous indicates that the request must not share user-credentials.
Coding the payment form
      <html>
        <head>
          <meta charset="UTF-8">
Your payment page must include a form, the action attribute of which must point to your server to send the payment request to the Sogenactif Office Serveur server.
You must specify where the Hosted Fields will be loaded by Sogenactif Hosted Fields in this form.
      <form role="form" id="payment-form" action="<YOUR_URL_TO_PROCEED_WITH_THE_PAYMENT">
        <label for="cardNumber">CARD NUMBER</label>
        <div id="cardNumber"></div>

        <label for="expiryDate">EXPIRY DATE</label>
        <div id="expiryDate"></div>

        <label for="cvv">SECURITY CODE</label>
        <div id="cvv"></div>
      </form>
For each div element, you can use the class attribute to customise the field for display.
In your form, the id declared for each field will be matched to its equivalent as a field selector when creating the Hosted Fields using our SDPX Javascript library (see the below section pertaining to the Hosted Fields setting up).
Depending on your needs, you may use only some Sogenactif Hosted Fields specific fields. For instance, you may use only the security code if you issue a payment by Wallet. The field list is shown in the below table.
| Field name | Field selector |
|---|---|
| Card number | CardNumber |
| Brand selection | cardBrands |
| Security code | csc |
| Expiry date | expiryDate |
If brand selection is on your form, it will be automatically populate by Sogenactif Hosted Fields in relation with the digits you entered in the cardNumber field.
Brand selection is done when 7 digits are entered, with a maximum of 9 digits.
Populating the sensitive data automatically
In their "Best Practices for Securing E-commerce" document, PCI states that the autocomplete functions should be disabled for fields containing sensitive data.
The various fields managed by Sogenactif Hosted Fields thus
include an attribute in the form of autocomplete='off'.
autocomplete='off' will not prevent the
browser from offering to automatically populate the information for a
sensitive data entry form.Creating and setting up the fields
Tht next step is to specify the container in charge of creating and setting up the Hosted Fields, in Javascript.
This requires creating an object as in the below example (named hostedFieldsConfig), that includes the
desired Hosted Fields setting.
      <script type="text/javascript">
        // Creating the Hosted Fields object
        var hostedFieldsConfig = {
            "merchantId: "<YOUR_MERCHANTID>",
            "merchantSessionToken": "<MERCHANTSESSIONTOKEN>",
            "style": {
                "input": {
                    "color": "#000000",
                    "font-family": "courier, monospace",
                    "font-size": "14px",
                },
                "input::placeholder": {
                    "color": "#999999"
                }
            },
            "fields": {
                "cardNumber": {
                    "id": "cardNumber",
                    "placeholder": "0000 0000 0000 0000"
                },
                "expiryDate": {
                    "id": "expiryDate",
                    "placeholder": "MM/YY"
                },
                "csc": {
                    "id": "cvv",
                    "placeholder": "NNN"
                }
            }
        };
      </script>
This object includes the following options:
- merchandId: your merchant ID used on Sogenactif
- merchantSessionToken: the
merchantSessionTokenretrieved during the authentication phase with Sogenactif and thehostedFieldsInitialize function - style: specifies the CSS rules that apply to all elements
- fields: specifies the fields available in the form
In the style section, you can specify the
fields input, :valid, :invalid and
::placeholder (or input:valid,
input:invalid and input::placeholder).
Also, you can define predefined styles for each
field. The various styles allowed are color,font-family,font-size,font-style,font-variant,font-weight,text-decoration,caret-color,background-color.
In the fields section, the link between the field selector and the identifier must be defined in the input form for each field. For example, in the above shown code, the csc field selector is linked to the security code ID of your form.
In the fields section, for expiryDate field,
you can specify if you want to control the expiration date, to know if it is higher than the current
month. You need to use the keyword
checkExpiredDate and populate it with "false" value.
"expiryDate": {
"id": "demoExpiryDate",
"checkExpiredDate": "false",
"placeholder": "MM/YY"
},
You can also specify the placeholder keyword for each field selector (see https://developer.mozilla.org/en-US/docs/Web/CSS/::placeholder).
The various fields specified in hostedFieldsConfig must then be loaded by
calling the create function of the
SDPX library.
    try {
        …
        var hostedFieldsInstance = sdpx.hostedfields.create(hostedFieldsConfig);
      } catch (error) {
        // exception handling on field creation
        console.log("Error!"+error.code+" "+error.label+" "+error.level);
      }
As in the example, it is mandatory to encapsulate the call with
the try,catch keywords to be able to
handle the error object returned
only in case of an error.
This error object includes the
following fields:
error.codeincludes the overall error code.error.originincludes the origin of the error.error.infoincludes the internationalised message associated with the error.
Please refer to the 'Handling errors generated by Hosted Fields' section for detailed codes and detailed error causes.
At this point, your web browser is supposed to display the sensitive data entry fields in their containers.
If you would like to have the error label in French (for instance), you
need to add the language keyword
with the desired language in the object handling the Hosted Fields
configuration as shown in the below example.
     <script type="text/javascript">
       // creating the Hosted Fields object
       var hostedFieldsConfig = {
         "merchantId": "<YOUR_MERCHANTID>",
         "language": "fr",
// other initialisationHandling styles on fields
For each field, you can handle styles depending on the event type the
field is involved in. The various styles are named sdpx-field-focus,sdpx-field-empty,sdpx-field-valid,sdpx-field-invalid.
Here is a sample code showing the definition of focus and invalid type styles.
      <style>

      .sdpx-field-focus {
        border-color: #66afe9;
        outline: 0;
        -webkit-box-shadow: inset 0 1px 1px rgba(0,0,0,0.075),0 0 8px rgba(102,175,233,0.6);
        box-shadow: inset 0 1px 1px rgba(0,0,0,0.075),0 0 8px rgba(102,175,233,0.6)
      }

      .sdpx-field-invalid {
        border-color: #a94442;
        outline: 0;
        -webkit-box-shadow: inset 0 1px 1px rgba(0,0,0,.075),0 0 8px rgba(169, 68, 66, 0.6);
        box-shadow: inset 0 1px 1px rgba(0,0,0,.075),0 0 8px rgba(169, 68, 66, 0.6);
      }
      </style>
The various styles available are:
| Style | Description |
|---|---|
| sdpx-field-focus | When the current field becomes focused. |
| sdpx-field-empty | When the current field loses focus and is empty. |
| sdpx-field-valid | When the current field, during entry, validates the semantic rules in place. |
| sdpx-field-invalid | When the current field, during entry, does not validate the semantic rules in place. |
| sdpx-field-ready | When the current field is ready for entry. |
Handling events on fields
For each field, you can handle the focus,blur,empty,valid,invalid,card-change
events.
Here is some sample code using the name of the object created in the previous sections.
    hostedFieldsInstance.on('blur', function (data) {
        // Handle here the various cases for each field for the blur event.
        // Here is an example of what is displayed in the impacted field logging console
        console.log('Blur callback invoked with data: ' +  JSON.stringify(data));
});| Event | Description |
|---|---|
| focus | When the current field takes the focus. |
| blur | When the current field loses focus. |
| empty | When the current field takes or loses focus and is empty or becomes empty during entry. |
| valid | When the current field, during entry, validates the semantic rules in place. |
| invalid | When the current field, during entry, does not validate the semantic rules in place. |
| field-ready | When a field is ready for entry. |
| all-fields-ready | When all fields are ready for entry. |
| error-init-fields | When the time to initialize all fields has been exceeded. |
| card-brand-selected | When the user changes the card type in the context of brand selection (MIF European rules (OJ EU 2015/751 L123, 19/05/2015)). |
| card-brand-entry | When the current entry allows to determine the available brand(s), be careful, the information returned at this event may include several data (VISA, CB for example). |
| error | When an error occurs on the Sogenactif Hosted Fields server and creation of documents or entry does not work. |
The data (named event in the below example) includes:
- For the
focus, blur, empty, valid, invalid, field-readyevents:event.typeincludes the name of the event as specified above.event.fieldIdincludes the id of the field concerned by the event.- When receiving an
invalidevent, a fieldevent.datacontains the following information :- An attribute named
event.data.reason, which includes the error reason (see below). - An attribute named
event.data.complementaryInformation, which, in the case of a length invalidity on card number or CVV fields, gives expected lengths :- For card number field,
event.data.complementaryInformation.minLengthandevent.data.complementaryInformation.maxLengthindicate minimum and maximum expected sizes respectively - For CVV field,
event.data.complementaryInformation.lengthgives a sequence of numbers separated by commas, representing all expected lengths.
- For card number field,
- An attribute named
- For the
all-fields-readyevent:event.typeincludes all-fields-ready.event.fieldIdincludes *.
- For the
card-brand-selectedevent:event.typeincludes card-brand-selected.event.fieldIdincludes cardBrands.- A field named
event.data.selectedBrandincludes the brand selected by the user ("CB" for example).
- For the
card-brand-entryevent:event.typeincludes card-brand-entry.event.fieldIdincludes cardBrands.- A field named
event.data.brandsincludes the brand(s) being entered, separated with "," ("CB,VISA" for example).
- For the
errorevent:event.typeincludes error.event.errorincludes the following data:error.codeincludes the overall error code.error.originincludes the cause of the error.error.infoincludes the internationalised message associated with the error.
Regarding invalid event, you can
have the following reasons in the field event.data.reason.
| Reason | Meaning |
|---|---|
| BAD_FORMAT | Field content does not respect the format. |
| BAD_LUHN | For card number field, luhn key is not valide. |
| NO_BRANDS | Impossible to have the card brand. |
| YEAR_TOO_FAR | For expiry date field, the year is too far (plus de 15 ans). |
| YEAR_TOO_OLD | For expiry date field, the year is too old. |
| TOO_SHORT | The field is too short. |
| TOO_LONG | The field is too long. |
For all other errors, please refer to the "Handling errors generated by Hosted Fields" section for detailed codes and detailed error causes.
Handling brand selection
The Sogenactif Hosted Fields solution, as a payment acceptance solution, is subject to the MIF European regulation (OJ EU 2015/751 L123 of the 19th of May 2015). Among these rules, the "brand selection" requires you to offer the customer, holder of a cobadged card, the brand selection at the time of payment.
Handling brand selection is based on two transaction-level pieces of information:
- the brand selected for the transaction processing: already existing
paymentMeanBrandfield - the brand selection method: already existing
paymentMeanBrandSelectionStatusfield
For PAN entering use case, this "brand selection" is automatically performed by Sogenactif Hosted Fields, you do not have to worry about it.
The selection made will be retrieved through the cardOrder and cardCheckEnrollment functions, using the
paymentToken field.
It can be done thanks to the event card-brand-entry of Sogenactif Hosted Fields instance with the display or not of the message
when the customer enters card numbers.
You define the message where you want to display it, but it needs to be hide by default. Here is a code example :
      <div id="brandMessage" style="display: none">
          Click on the desired logo to change the brand
      </div>
Then, in the Javascript code of your page, for the desired Sogenactif Hosted Fields instance, in order to manage the display of the message :
      hostedFieldsInstance.on('card-brand-entry', function (event) {
          if (event.data) {
              if (event.data.brands){
                  document.getElementById("brandMessage").style.display = "block";
              }
              else {
                  document.getElementById("brandMessage").style.display = "none";
              }
          }
      });
For payments with a card stored Sogenactif wallet, the container in charge of creating and setting up the "brand selection" should include the cobranded list of the used card.
- This list is retrieved from the field
paymentMeanCoBadgingBrandListgetWalletDataresponse. - You have to set this list in the
paymentMeanBrandCobadgedListfield, from thecardBrandsfield selector, as in the below example.
Then, the user will be able to choose one of the
listed brand, which will allow the brand selection. The selection made
will be retrieved by the walletOrder
and walletCheckEnrollment functions,
using the paymentToken field.
          <script type="text/javascript">
            // Creating the Hosted Fields object
            var hostedFieldsConfig = {
                "merchantId: "<YOUR_MERCHANTID>",
                "merchantSessionToken": "<MERCHANTSESSIONTOKEN>",
                "style": {
                    "input": {
                        "color": "#000000",
                        "font-family": "courier, monospace",
                        "font-size": "14px",
                    },
                    "::placeholder": {
                        "color": "#999999"
                    }
                },
                "fields": {
                    "cardBrands": {
                      "id": "mon-div-cardBrands",
    		          "paymentMeanBrandCobadgedList": "CB, VISA"
                    },
                    "csc": {
                        "id": "mon-div-cvv",
                        "placeholder": "123"
                    }
                }
            };
          </script>
Handling errors generated by Hosted Fields
In every Sogenactif Hosted Fields function, errors are returned
in an error object from the event object below:
event.typeincludes error.event.errorincludes the following data:error.codeincludes the overall error code.error.originincludes the origin of the error.error.infoincludes the internationalised message associated with the error.
Here is the list of errors you may have to cope with in the various Hosted Fields functions:
| Code | Origin | Meaning |
|---|---|---|
| BAD_FORMAT | CSC | CVV format error while tokenizing. |
| BAD_FORMAT | CARD_NUMBER | Card number format error while tokenizing. |
| BAD_FORMAT | EXPIRY_DATE | Expiry date format error while tokenizing. |
| BAD_CONTENT | IFRAME_PARAM | Missing/incorrect iFrame generation service input parameter. |
| BAD_CONTENT | TOKENIZE_PARAM | Missing/incorrect tokenization service input parameter. |
| BAD_CONTENT | CARDINFO_PARAM | Missing/incorrect brand management service input parameter. |
| BAD_CONTENT | ACCESS_TOKEN | Invalid merchantToken or securityToken. |
| BAD_CONTENT | INIT_FRAMES | Invalid control iFrame generation. |
| BAD_CONTENT | INIT_FIELDS | Invalid data field type Iframe generation. |
| BAD_CONTENT | CONF_BAD_CSS | Invalid CSS configuration sent. |
| TECHNICAL_ERROR | IFRAME_ERR | Technical error while generating iFrames. |
| TECHNICAL_ERROR | TOKENIZE_ERR | Technical error while managing the tokenize. |
| TECHNICAL_ERROR | CARDINFO_ERR | Technical error while calling the brand selection service. |
| TECHNICAL_ERROR | INIT_URL_SDK | Technical error while initialising the SDK URL. |
| TECHNICAL_ERROR | CRT_FIELDS | Technical error in the configuration of the fields sent. |
| INIT_FIELDS | TIMEOUT | Could not load the data field in the allotted time. |
| INIT_FIELDS | NOT_HTTPS_SITE | Your site is not using https. |
Linking the payment form validation event to the SDPX library
Validation of the payment form is done by adding a functionality on the EventListener button to validate the form.
In this functionality, the tokenize function of the SDPX library must be called in order to retrieve the payment token.
Here is an example based on the previously defined form (called payment-form).
    document.getElementById("payment-form").addEventListener("submit", function (event) {
      event.preventDefault(); // so as not to allow the default behaviour of the button to be run
      try {
        hostedFieldsInstance.tokenize().then(
            function(success) {
                // Code to handle the error-free tokenize return
                // the success variable includes the paymentToken and the cardData object
                //  these values must be inserted in some hidden fields
                //  of your form to be received by your server

                // The default behaviour of the form button is run
                event.target.submit();
            },
            function(error) {
              // Code to handle the tokenize return error (only the error)
              console.log(`Error!'+error.code+' '+error.label+' '+error.level);
            }
        );
      } catch (e) {
          // Code to handle the tokenize function exceptions

       }
      });
As shown in the example, it is mandatory to encapsulate the call
with the try,catch keywords in order
to handle exceptions on the call to the function.
At this time, your web browser has validated the payment form and your server will be able to make the payment via Sogenactif Office Serveur if there is no error.
this part of the script, along with the initialisation of the Hosted Fields fields, must be inserted at the end of your form, in order to allow this form to run after the page is fully loaded.
It is also important to configure the default behaviour of
the event.target.submit button if the tokenize function is
successful by calling document.submit().
If successful, the tokenize function returns a payment token to
be used when calling Sogenactif Office Serveur, for instance such as with
the cardOrder function.
This function also returns a cardData object which contains
the masked PAN in cardData.maskedPan and the
card expiry date in cardData.cardExpiryDate.
These data can be used for your fraud engine befare calling payment functions.
In the above shown example, in the promised function, the payment token
is returned in the success variable
given as a parameter to the function.
The payment token is in the success.token object and also
in success.paymentToken object.
Card information are in success.cardData object.
In case of errors, in the promised function, these errors are reported
in an error object:
event.typeincludes error.event.errorincludes the following data:error.codeincludes the overall error code.error.originincludes the cause of the error.error.infoincludes the internationalised message associated with the error.
Please refer to the "Handling errors generated by Hosted Fields" section for detailed codes and detailed error causes.
Activating a tracing system in the form page
Current browsers allow to display a tracing system in browsers when the developer tools are enabled.
The SDPX library allows you, during the debugging phase of your payment form, to enable traces in the console so as to view the various processes performed by the library.
You must add the logLevel keyword
with the desired level in the object that handles the Hosted Fields
configuration as shown in the below example.
      <script type="text/javascript">
        // Creating the Hosted Fields object
        var hostedFieldsConfig = {
          "merchantId": "<YOUR_MERCHANTID>",
          "logLevel": "debug",
          // other initialisation
By default, no traces are present in the browser console, so the keyword must be explicitly declared with the desired level.
There are four different levels of traces that have an ascending hierarchical order (the first one therefore includes the other levels):
- debug
- info
- warn
- error
As of today, the UI of developer tools in Google chrome has changed where we select the log level of log statements being shown in the console. There is a logging level drop-down beside Filter input box.
You may consult Google when site for information: https://developer.chrome.com/docs/devtools/console/reference/#level.
in order not to display anything in the browser console of future buyers on your site, it is mandatory to remove the logLevel keyword when your form is running and you are going to go live.
If not done, this information could be useful to a potential hacker to know how your site runs and compromise it.
Desactivate https checking
By default, all the communications between your form and Sogenactif Hosted Fields must be done in https.
The SDPX library allows you, during the debugging phase of your payment form, to deactivate https so as to avoid to install a certificate in your development environment.
You must add the mode keyword with the desired mode in the object that handles the Hosted Fields
configuration as shown in the below example..
      <script type="text/javascript">
        // Creating the Hosted Fields object
        var hostedFieldsConfig = {
          "merchantId": "<VOTRE_MERCHANTID>",
          "mode": "development",
          // other initialisation
By default, https checking is active, so the keyword must be explicitly declared with the desired mode.
There is only one mode:
- development
it is mandatory to remove the keyword when your form is running and you are going to go live because you need to do all calls to Sogenactif Hosted Fields in secured mode.
If not done, this information could be useful to a potential to intercept the data of your site.
Manage accessibility constraints
It is your form that must manage accessibility constraints to be WCAG/RG2A compliant.
However, in addition to the placeholder, it is now possible to put custom labels to iframe title as well as the “aria-label” of a field.
You need to add keywords title
and caption in the object managing
the Hosted Fields configuration as shown in the example below.
      <script type="text/javascript">
        // Hosted Fields object creation
          ...
          "fields": {
            "cardNumber": {
              "id": "demoCardNumber",
              "title": "Enter the card number",
              "caption": "Card number"
            },
            "cardBrands": {
              "id": "demoCardBrands"
            },
            // other initializations
These properties are optional. If they are not specified, they take the default values presented in the table below (only managed in French and English):
| Language | Field identifier | Message |
|---|---|---|
| fr | cardNumber-iframe-title | Entrez le numéro de carte |
| fr | cardNumber-field-caption | Numéro de carte |
| fr | cardBrands-iframe-title | Marques de la carte |
| fr | expiryDate-iframe-title | Entrez la date d'expiration de la carte |
| fr | expiryDate-field-caption | Date d'expiration |
| fr | csc-iframe-title | Entrez le code de sécurité de la carte |
| fr | csc-field-caption | Code de sécurité |
| en | cardNumber-iframe-title | Enter the card number |
| en | cardNumber-field-caption | Card number |
| en | cardBrands-iframe-title | Card brands |
| en | expiryDate-iframe-title | Enter the expiry date of the card |
| en | expiryDate-field-caption | Expiry date |
| en | csc-iframe-title | Enter the card security code |
| en | csc-field-caption | Security code |
Step 4: testing on the customer’s test environment
The test and integration steps can be performed using the test environment.
The test environment URL is: https://office-server-sogenactif.test.sips-services.com
| Name of the iFrames initialisation service | /rs-services/v2/authentication/hostedFieldsInitialize |
| Merchant ID | 201000194850001 |
| Key version | 1 |
| Secret Key | fZQcZA3XTLBhR4n9qtnIGqYun5UEtDzN4Pm6817MJF4 |
In the test environment, the authorisation process is simulated. This means there is no need to use real means of payment to perform tests.
You can use the following VISA card to simulate an accepted payment:
| Test card | See the "Test Cards" page |
| Security code | 123 |
| Validity date | must be greater than the current month |
transactionReference. Therefore, you must
send the populated transactionReference field in your test
requests.Step 5: validating the switch to the production environment
Once your have tested your website connection to Sogenactif Hosted Fields, you can validate the connection to the production version of Sogenactif Hosted Fields.
Prior to this, we recommend you block public access to your website to prevent customers from carrying out transactions during this validation phase.
To switch to the production server, you must change the URL in order to connect to the Sogenactif production server using the merchantId, secretKey and keyVersion credentials you received during the registration phase.
| Sogenactif URL | https://office-server.sogenactif.com |
| merchantId | Webshop ID received by e-mail |
| SecretKey | Secret key you can retrieve from the Sogenactif Téléchargement extranet |
| KeyVersion | Secret key version retrieved from Sogenactif Téléchargement (obviously 1 for the first key) |
Step 6: launching live operation
Once the validation for the transition to live operation has been carried out, make your site and/or application public so your customers can make purchases and payments.
On the same day:
- Monitor acceptance rates (number of
responseCode00 / total number of transactions) - check the nature of non-banking declines:
- Technical issue:
responseCode90, 97, 99 - Fraud:
responseCode34 - Max. number of payments attempts reached:
ResponseCode75.
- Technical issue:
The next day:
- Check that all transactions processed (accepted and declined) are in the Transactions report.
- Check the operations you have carried out and remittances (report option) in the Operations report.